

Over the years our garden has transformed from a traditional flat fenced area to one based on raised garden boxes. Raised bed gardening has many benefits: it’s easier to work at higher than ground level; raised beds are easier to keep weeded; and you can grow more in a smaller space. They’re also a great option for patio or roof-top gardening where outdoor space is at a premium.
But starting a raised-bed garden from scratch can be an expensive project with the costs of lumber, soil, compost and tools. Repurposing wooden pallets is a great way to save money and create an environmentally friendly planter.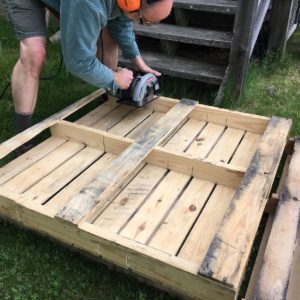
In the video, Sarah gives an overview of the build process. Follow the steps below to build your own garden planter!
For this project you will need:
- Two wooden palettes in good condition. Choose pallets with slats spaced as close together as possible. For a square planter, you’ll need 4 sections with 3 slats each. For a rectangular planter, you’ll need 6 sections. (The pallets we used had a total of 10 slats each so we were able to get at total of 6 sections from two pallets.)
- Deck screws for wooden decking material. We used eight 3.5 inch screws for each square box. For a rectangular planter you will need 12 or 18 screws per garden box.

- Circular saw or hand saw.
- Electric drill and screwdriver.
- Weed paper.
- Soil and compost.
- Some plants!
Instructions:
- Decide how large each planter will be and how many boxes you want to build. This will give you a total number of pallets required.
- Look over the pallets and decide how best to cut them. Because our pallets had 10 slats each and we only needed 9 slats total we were able to cut around some broken horizontal pieces to make the structure stronger. Keep in mind that you want to retain as much of the pallet’s cross brace and backing as possible for maximum strength.

- Lay your pallets out and cut them as planned. With a circular saw you’ll have to make two cuts for each section – one on the front and one on the back, to get all the way through the thick vertical supports.
- Lay out your cut pieces and decide how you want to put them together. We set them so the end caps are facing in while the sides face out, but you can assemble them different ways depending on your preference. However, you want to check that you have a good surface to join each of the pieces together at the corners.
- Pre-drill your screw holes. We used two screws per join on our square boxes. You might want to use 3 screws per join for a larger rectangular box, for more support.
- Attach the pieces together using deck screws. We like to drive the screw at a slight angle to give more stability.

- Place your box where you want it to sit, then line it with weed paper, ensuring that the permeable fabric comes about half way up the sides. This will help keep the dirt in the box.
- Fill with soil and compost.
- Plant your plants, and water them. Add some mulch on top to help protect young plants and keep the soil moist.
We hope you enjoy this tutorial. If you decide to build some planters of your own please share your garden photos with us. Happy gardening and crafting!